
Helium 是一个区块链,它为物联网设备创建一个分散的LoRaWAN全球无线网络,基于POC覆盖证明奖励用户。几年前我就遇到了这个想法,但担心他们只允许单个设备提供 LoRaWAN 覆盖!Helium现已开放以支持许多经批准的设备制造商。我决定购买一台 Panther X1 来试用一下。虽然在中国出于个人目的(而不是作为公司)使用区块链并不违法,但中国对许多与区块链相关的服务进行了严格审查。
Helium 依赖于 libp2p。中国的防火墙(GFW)具有非常有效的机制,可以在国内识别 libp2p 并在 SSL 握手期间注入连接重置。虽然您可以在 Helium 设备前面放置一个商业 VPN,但这些解决方案中的大多数都不允许打开端口。Helium 应该通过提供中继服务来解决这个问题,但这种中继机制在中国国内也被破坏了。这将导致您的节点保持完全同步,但从不参与覆盖证明(见证/信标)。如果你想在中国去中心化,你需要在中国之外搭建自己的桥梁来参与。我通过使用自托管的 Wireguard VPN 和客户端在中国境外的云中实现了到虚拟专用服务器 (VPS) 的桥接。以下是重现我的设置的步骤。
Panther X1 内部是一个带有 LoRaWAN 适配器的 Raspberry Pi 4B。Raspberry Pi 已锁定,但允许 SSH 连接。为了在此设备上安装 VPN 客户端并有效地对其进行故障排除,我们需要侵入设备。幸运的是,Panther X1 并不那么安全(注意:Panther X2 实现了额外的安全性)。
打开设备,从设备上取下四个橡胶垫,取下外壳中的四个螺丝,取下所有固定 LoRaWAN 适配器的螺丝,然后将适配器轻轻向上拉向天线。您会发现它与 Raspberry Pi 板上的引脚分开。
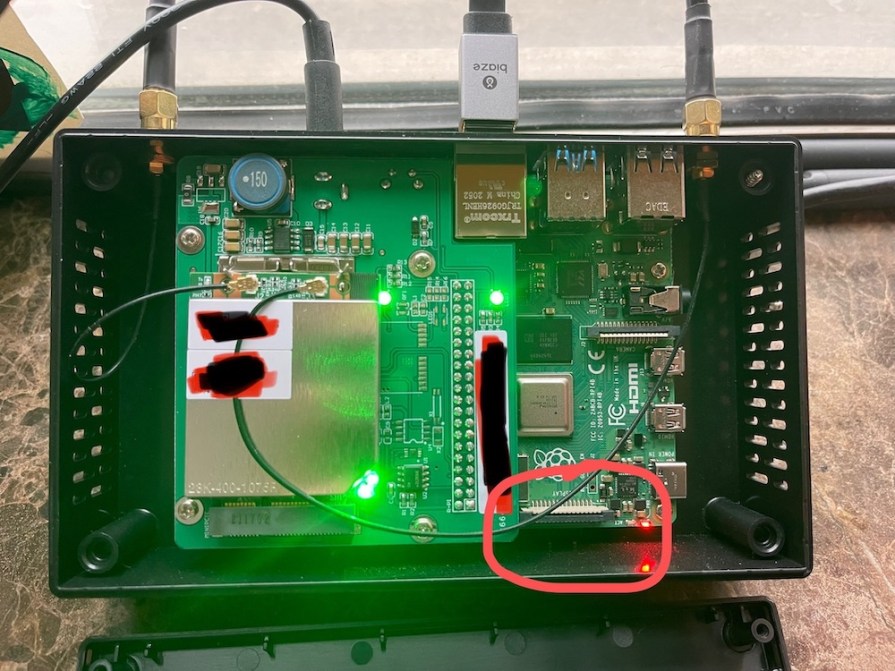
一旦 LoRaWAN 适配器断开(您可以保持天线连接,只需将板移到一边),卸下 Raspberry Pi 的所有螺钉。在底部,您会找到一个微型 SD 卡。移除此卡,并将其安装到 Linux 计算机上的 USB micro SD 读卡器中(在较旧的 MacOS 上,您可以使用 exFuse,Windows 可能有类似的程序 – 请在评论中告诉我)。找到诸如“/dev/sdb2”之类的设备。您的计算机上的字母可能不同,但它是我们想要的格式化为 ext4 的第二个分区。
# Mount the device to a mountpoint that is available
sudo mount /dev/sdb2 /mnt
vim /root/.ssh/authorized_keys
# Append your SSH public key to the list (if you don't know what a SSH public key is, you will need to google it to learn more) # Once completed, unmount the device sudo umount /mnt
修改此文件后,我们现在可以将 micro SD 卡重新安装回 Raspberry Pi。现在是在 Raspberry Pi CPU、RAM 和桥接器上安装散热器的好时机——否则设备会达到 80多度。最后,重新连接 LoRaWAN 适配器——注意确保引脚正确对齐。重新安装外壳和橡胶支脚的螺钉。您可以启动 Panther X1 备份并发现您的 SSH root 帐户现在接受使用您的私钥登录。
要安装wireguard服务器和客户端,我按照本指南进行了以下一些修改:
VPS 上的 Wireguard VPN 服务器
sudo apt update
sudo apt upgrade
reboot
sudo apt install wireguard vim fail2ban
sudo -i
cd /etc/wireguard/
umask 077; wg genkey | tee privatekey | wg pubkey > publickey
cat privatekey
cat publickey
sudo vim /etc/wireguard/wg0.conf
# Replace PrivateKey with the server private key
# We will generate the Peer client PublicKey later... leave the section commented out for now
[Interface]
## My VPN server private IP address (Don't change this unless required)
Address = 192.168.12.1/24
## My VPN server port ## ListenPort = 41194
## VPN server's private key i.e. /etc/wireguard/privatekey
PrivateKey = REPLACE ME

PostUp = /etc/wireguard/helper/add-nat-routing.sh
PostDown = /etc/wireguard/helper/remove-nat-routing.sh

# (come back and uncomment this once you set up the client!)
#[Peer]
## Client public key
# PublicKey = REPLACE ME
#
## client VPN IP address (note the /32 subnet) - (Don't change this unless required) ##
#AllowedIPs = 192.168.12.2/32
sudo mkdir /etc/wireguard/helper
sudo vim /etc/wireguard/helper/add-nat-routing.sh
#!/bin/bash
# https://www.cyberciti.biz/faq/ubuntu-20-04-set-up-wireguard-vpn-server/
IPT="/sbin/iptables"
#IPT6="/sbin/ip6tables"
IN_FACE="eth0"                   # NIC connected to the internet
WG_FACE="wg0"                    # WG NIC
SUB_NET="192.168.12.0/24"        # WG IPv4 sub/net aka CIDR
WG_PORT="41194"                  # WG udp port
HELIUM_PORT="44158"              # Helium tcp port
HELIUM_IP="192.168.12.2"         # Helium VPN client IP address
#SUB_NET_6="fd42:42:42:42::/112" # WG IPv6 sub/net

## IPv4 ##
$IPT -t nat -I POSTROUTING 1 -s $SUB_NET -o $IN_FACE -j MASQUERADE
$IPT -I INPUT 1 -i $WG_FACE -j ACCEPT
$IPT -I FORWARD 1 -i $IN_FACE -o $WG_FACE -j ACCEPT
$IPT -I FORWARD 1 -i $WG_FACE -o $IN_FACE -j ACCEPT
$IPT -I INPUT 1 -i $IN_FACE -p udp --dport $WG_PORT -j ACCEPT

# outside the wall you can achieve anything
$IPT -t nat -A PREROUTING -i $IN_FACE -p tcp --dport $HELIUM_PORT -j DNAT --to-destination $HELIUM_IP:$HELIUM_PORT

## IPv6 (Uncomment if ipv6 is required) ##
## $IPT6 -t nat -I POSTROUTING 1 -s $SUB_NET_6 -o $IN_FACE -j MASQUERADE
## $IPT6 -I INPUT 1 -i $WG_FACE -j ACCEPT
## $IPT6 -I FORWARD 1 -i $IN_FACE -o $WG_FACE -j ACCEPT
## $IPT6 -I FORWARD 1 -i $WG_FACE -o $IN_FACE -j ACCEPT
sudo vim /etc/wireguard/helper/remove-nat-routing.sh
#!/bin/bash
IPT="/sbin/iptables"
#IPT6="/sbin/ip6tables"
IN_FACE="eth0"                   # NIC connected to the internet
WG_FACE="wg0"                    # WG NIC
SUB_NET="192.168.12.0/24"        # WG IPv4 sub/net aka CIDR
WG_PORT="41194"                  # WG udp port
HELIUM_PORT="44158"
HELIUM_IP="192.168.12.2"
#SUB_NET_6="fd42:42:42:42::/112" # WG IPv6 sub/net

# IPv4 rules #
$IPT -t nat -D POSTROUTING -s $SUB_NET -o $IN_FACE -j MASQUERADE
$IPT -D INPUT -i $WG_FACE -j ACCEPT
$IPT -D FORWARD -i $IN_FACE -o $WG_FACE -j ACCEPT
$IPT -D FORWARD -i $WG_FACE -o $IN_FACE -j ACCEPT
$IPT -D INPUT -i $IN_FACE -p udp --dport $WG_PORT -j ACCEPT
$IPT -t nat -D PREROUTING -i $IN_FACE -p tcp --dport $HELIUM_PORT -j DNAT --to-destination $HELIUM_IP:$HELIUM_PORT

# IPv6 rules (uncomment if ipv6 is required) #
## $IPT6 -t nat -D POSTROUTING -s $SUB_NET_6 -o $IN_FACE -j MASQUERADE
## $IPT6 -D INPUT -i $WG_FACE -j ACCEPT
## $IPT6 -D FORWARD -i $IN_FACE -o $WG_FACE -j ACCEPT
## $IPT6 -D FORWARD -i $WG_FACE -o $IN_FACE -j ACCEPT
sudo chmod +x /etc/wireguard/helper/*.sh
sudo ufw allow 41194/udp
# Allow the helium port to route traffic to wireguard client IP
sudo ufw route allow proto tcp to 192.168.12.2 port 44158
sudo ufw allow ssh
sudo ufw enable
sudo ufw status
sudo systemctl enable wg-quick@wg0
sudo systemctl start wg-quick@wg0
sudo systemctl status wg-quick@wg0
sudo wg
# Make sure you have opened 41194/udp in your cloud provider security group!
sudo vim /etc/sysctl.conf
# append the following to the end of that file:
# Wireguard
net.ipv4.ip_forward = 1
net.ipv6.conf.all.forwarding=1

# reload the /etc/sysctl.conf file:
sysctl -p
Panther X1 上的 Wireguard 客户端
sudo apt update
sudo apt upgrade
reboot
sudo apt install wireguard vim fail2ban
sudo -i
cd /etc/wireguard/
umask 077; wg genkey | tee privatekey | wg pubkey > publickey
cat privatekey
cat publickey
# Go back to server /etc/wireguard/wg0.conf, fill in the public key into the [Peer] section
# Uncomment peer section, and then run on server: sudo systemctl restart wg-quick@wg0

# Set up client on Panther
# Replace PrivateKey and PublicKey - pay attention to server vs client
# Replace Endpoint with your server's public IP address or DNS
sudo vim /etc/wireguard/wg0.conf
[Interface]
## This Desktop/client's private key ##
PrivateKey = REPLACE ME

## Client ip address ##
Address = 192.168.12.2/24

[Peer]
## Ubuntu 20.04 server public key ##
PublicKey = REPLACE ME

## set ACL ##
AllowedIPs = 0.0.0.0/0
## Your Ubuntu 20.04 LTS server's external address and port "156.283.123.9:41194" ##
Endpoint = REPLACEME:41194

## Key connection alive ##
PersistentKeepalive = 15
sudo systemctl enable wg-quick@wg0
sudo systemctl start wg-quick@wg0
sudo systemctl status wg-quick@wg0
sudo wg
仔细检查一切是否正常。我也偶尔会遇到掉线,所以我在客户端上有一个监视脚本,如果我们失去连接,它会重新启动wireguard客户端,或者在重新启动时启动它。在确定一切正常之前不要启用此功能。
sudo vim /root/wireguard_watch.sh

#!/bin/bash
if ping -c 1 192.168.12.1 &> /dev/null;then echo "INFO: Wireguard alive"; else echo "ERROR: Wireguard dead, restarting wg-quick@wg0"; systemctl restart wg-quick@wg0;fi
sudo crontab -e
您将在此文件中看到现有行。忽略它,不要管它。添加一个新行,其中包含:
* * * * * /root/wireguard_watch.sh
我还安装了Panther X1 仪表板:
sudo -i
cd /root
git clone https://github.com/Panther-X/PantherDashboard.git
cd PantherDashboard
sudo sh install.sh
您现在可以使用 admin/admin 作为登录名在 https://YourInternalPantherIPAddress 访问仪表板。
过 SSH,您还可以探索设置并排除日志故障:
tail -f /opt/miner_data/logs/console.log
sudo docker exec helium-miner miner info height
在墙外,我们可以实现任何目标。玩得开心!
来源: https://www.benchodroff.com/2022/01/15/helium-blockchain-in-china-using-a-panther-x1-and-wireguard-vpn/
0